
A Functional Montessori-Inspired Kitchen for Toddlers
The main reason why I wanted to setup a kitchen for Kimi is I wanted him to learn to wash his hands by himself. That was it! There was a lot of process involved before he can wash his hands. I would need to guide him towards the bathroom or kitchen. He will then carry his chair which also acts as a stool in this case for him to reach the sink as they are too high. I will then help him climb up to his chair and down after he is done. The chair that we have here is also not as sturdy as a stool but the stools I see out in the market for kids are either too bulky for our small home or too low. We also do not have a space for a learning tower in the kitchen. So with that, I thought of setting up a toddler kitchen for him.
I will show you the step-by-step process I took in setting up Kimi’s Montessori kitchen.

I bought the Duktig Play Kitchen from Ikea which is perfect for our purpose. It has a sizeable sink, large countertop and cabinets with shelves.
While assembling, I chose to not include the faucet that it came with. Also, I was going back and forth between not including the upper part of this kitchen but decided in the end to install it which was a good decision.
From the countertop up, this is how I first set it up:
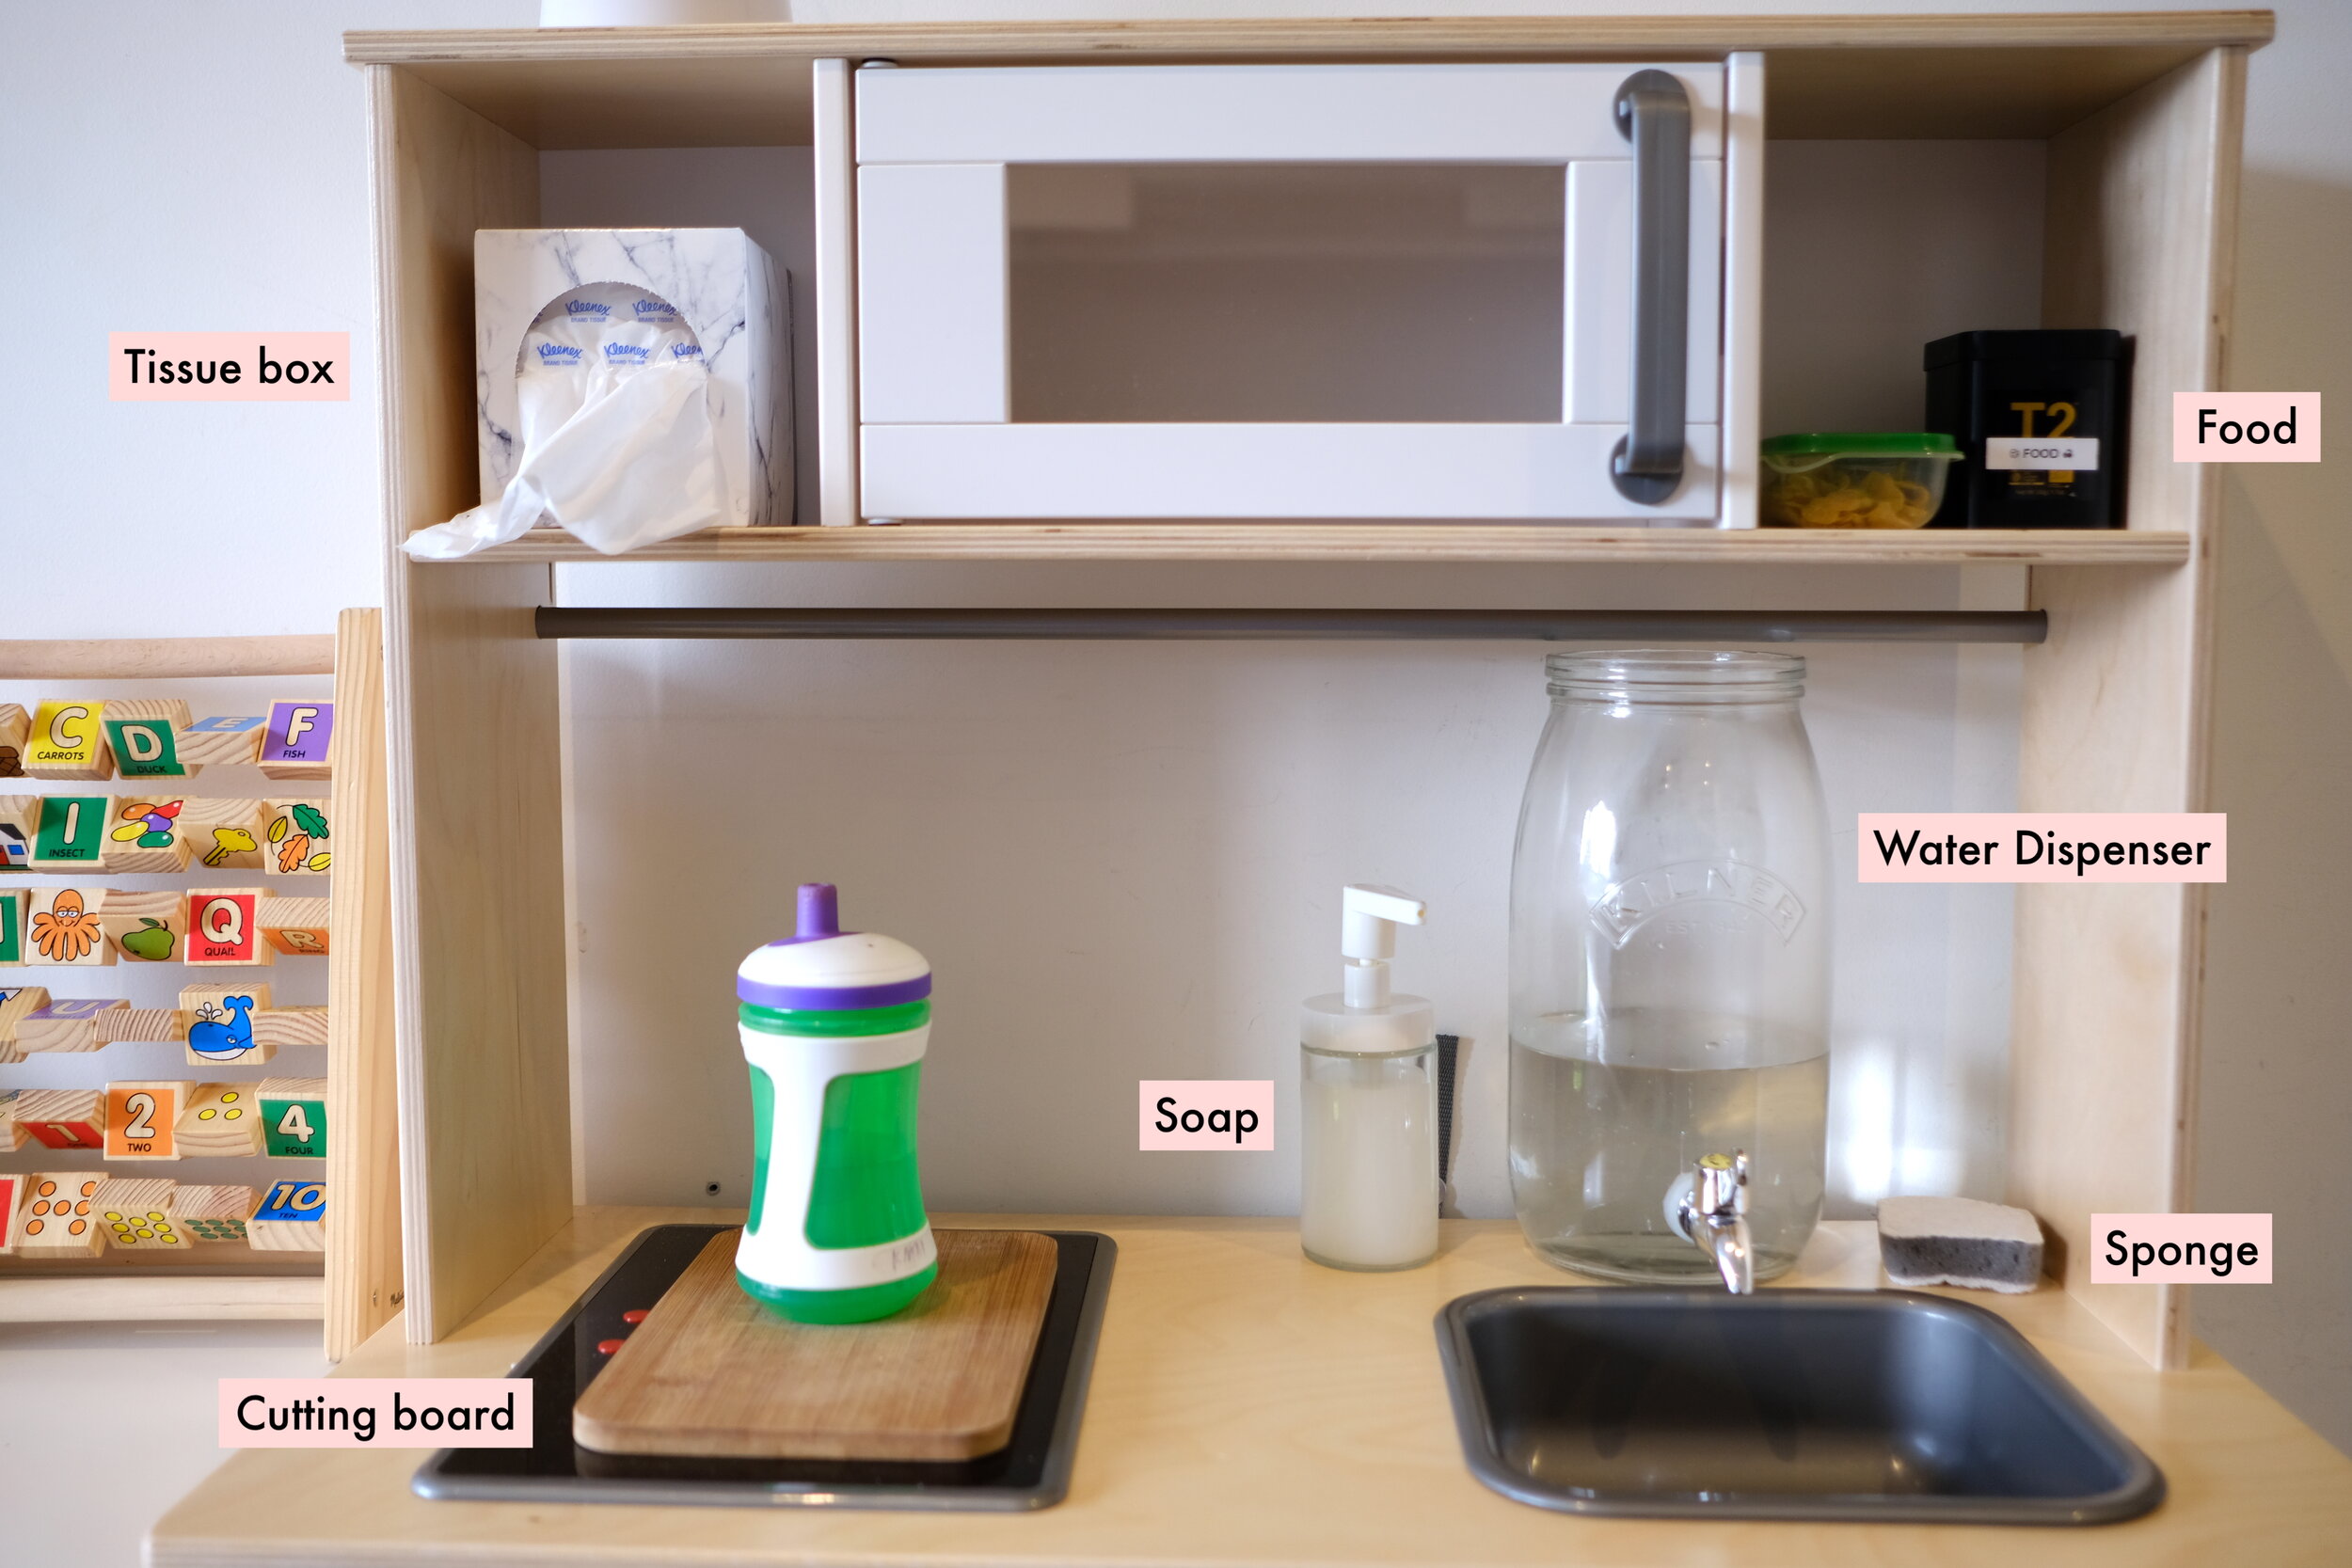
Water Dispenser - I removed the faucet to place instead a water dispenser. I had a hard time looking for a glass dispenser here in Australia that is not too large and would fit in the small space at the back of the sink but I was happy to end up with this Kilner drinks dispenser which has a 3-litre capacity and has a valve that is so easy for my son to open and close. I also did not use the lid that it came with as the lid was not fitted with a gasket and felt a little bit wobbly. The rod was actually perfect as it prevents the dispenser from tipping over. The sideboards / base of the upper shelf were also great as they help secure the contents of the countertop.
In the morning, I fill-out the water dispenser up to 1/3 of its height which I feel is the level that I am comfortable to work with in case there will be spills (and yes, there are always spills!). As this is not a working sink, I also just take out the basin and dump the used water in the kitchen sink afterwards.

Soap Dispenser - I chose this glass soap dispenser from Ikea which is perfect for little hands and is very sturdy.
Sponge - I placed a sponge in the countertop for Kimi to use to wipe small spills on the countertop.
Cutting Board - The cutting board is actually set on top of a play stovetop. I do not see any need for the stovetop as I also wanted to impart to Kimi the knowledge that stovetops can be dangerously hot when turned on so I instead covered it with a cutting board. I am still in the process of looking for and buying a bigger cutting board so that I can completely remove the stovetop.
Tissue Box - I placed a tissue box in the top left shelf so that Kimi can just help himself when he needed a tissue.
Food Containers - I placed snacks that I am happy for him to munch on food on in food containers which I placed in the top right shelf.
As for the play microwave, I just left it there, initially thinking that we can use it as an extra cabinet but right now Kimi is using it for pretend play. Whenever someone is using the microwave, he would also rush to get a plate from his cabinet and put it inside his pretend microwave. He will make a sound and do a countdown as well before he takes out his plate.
Moving on to the bottom part:
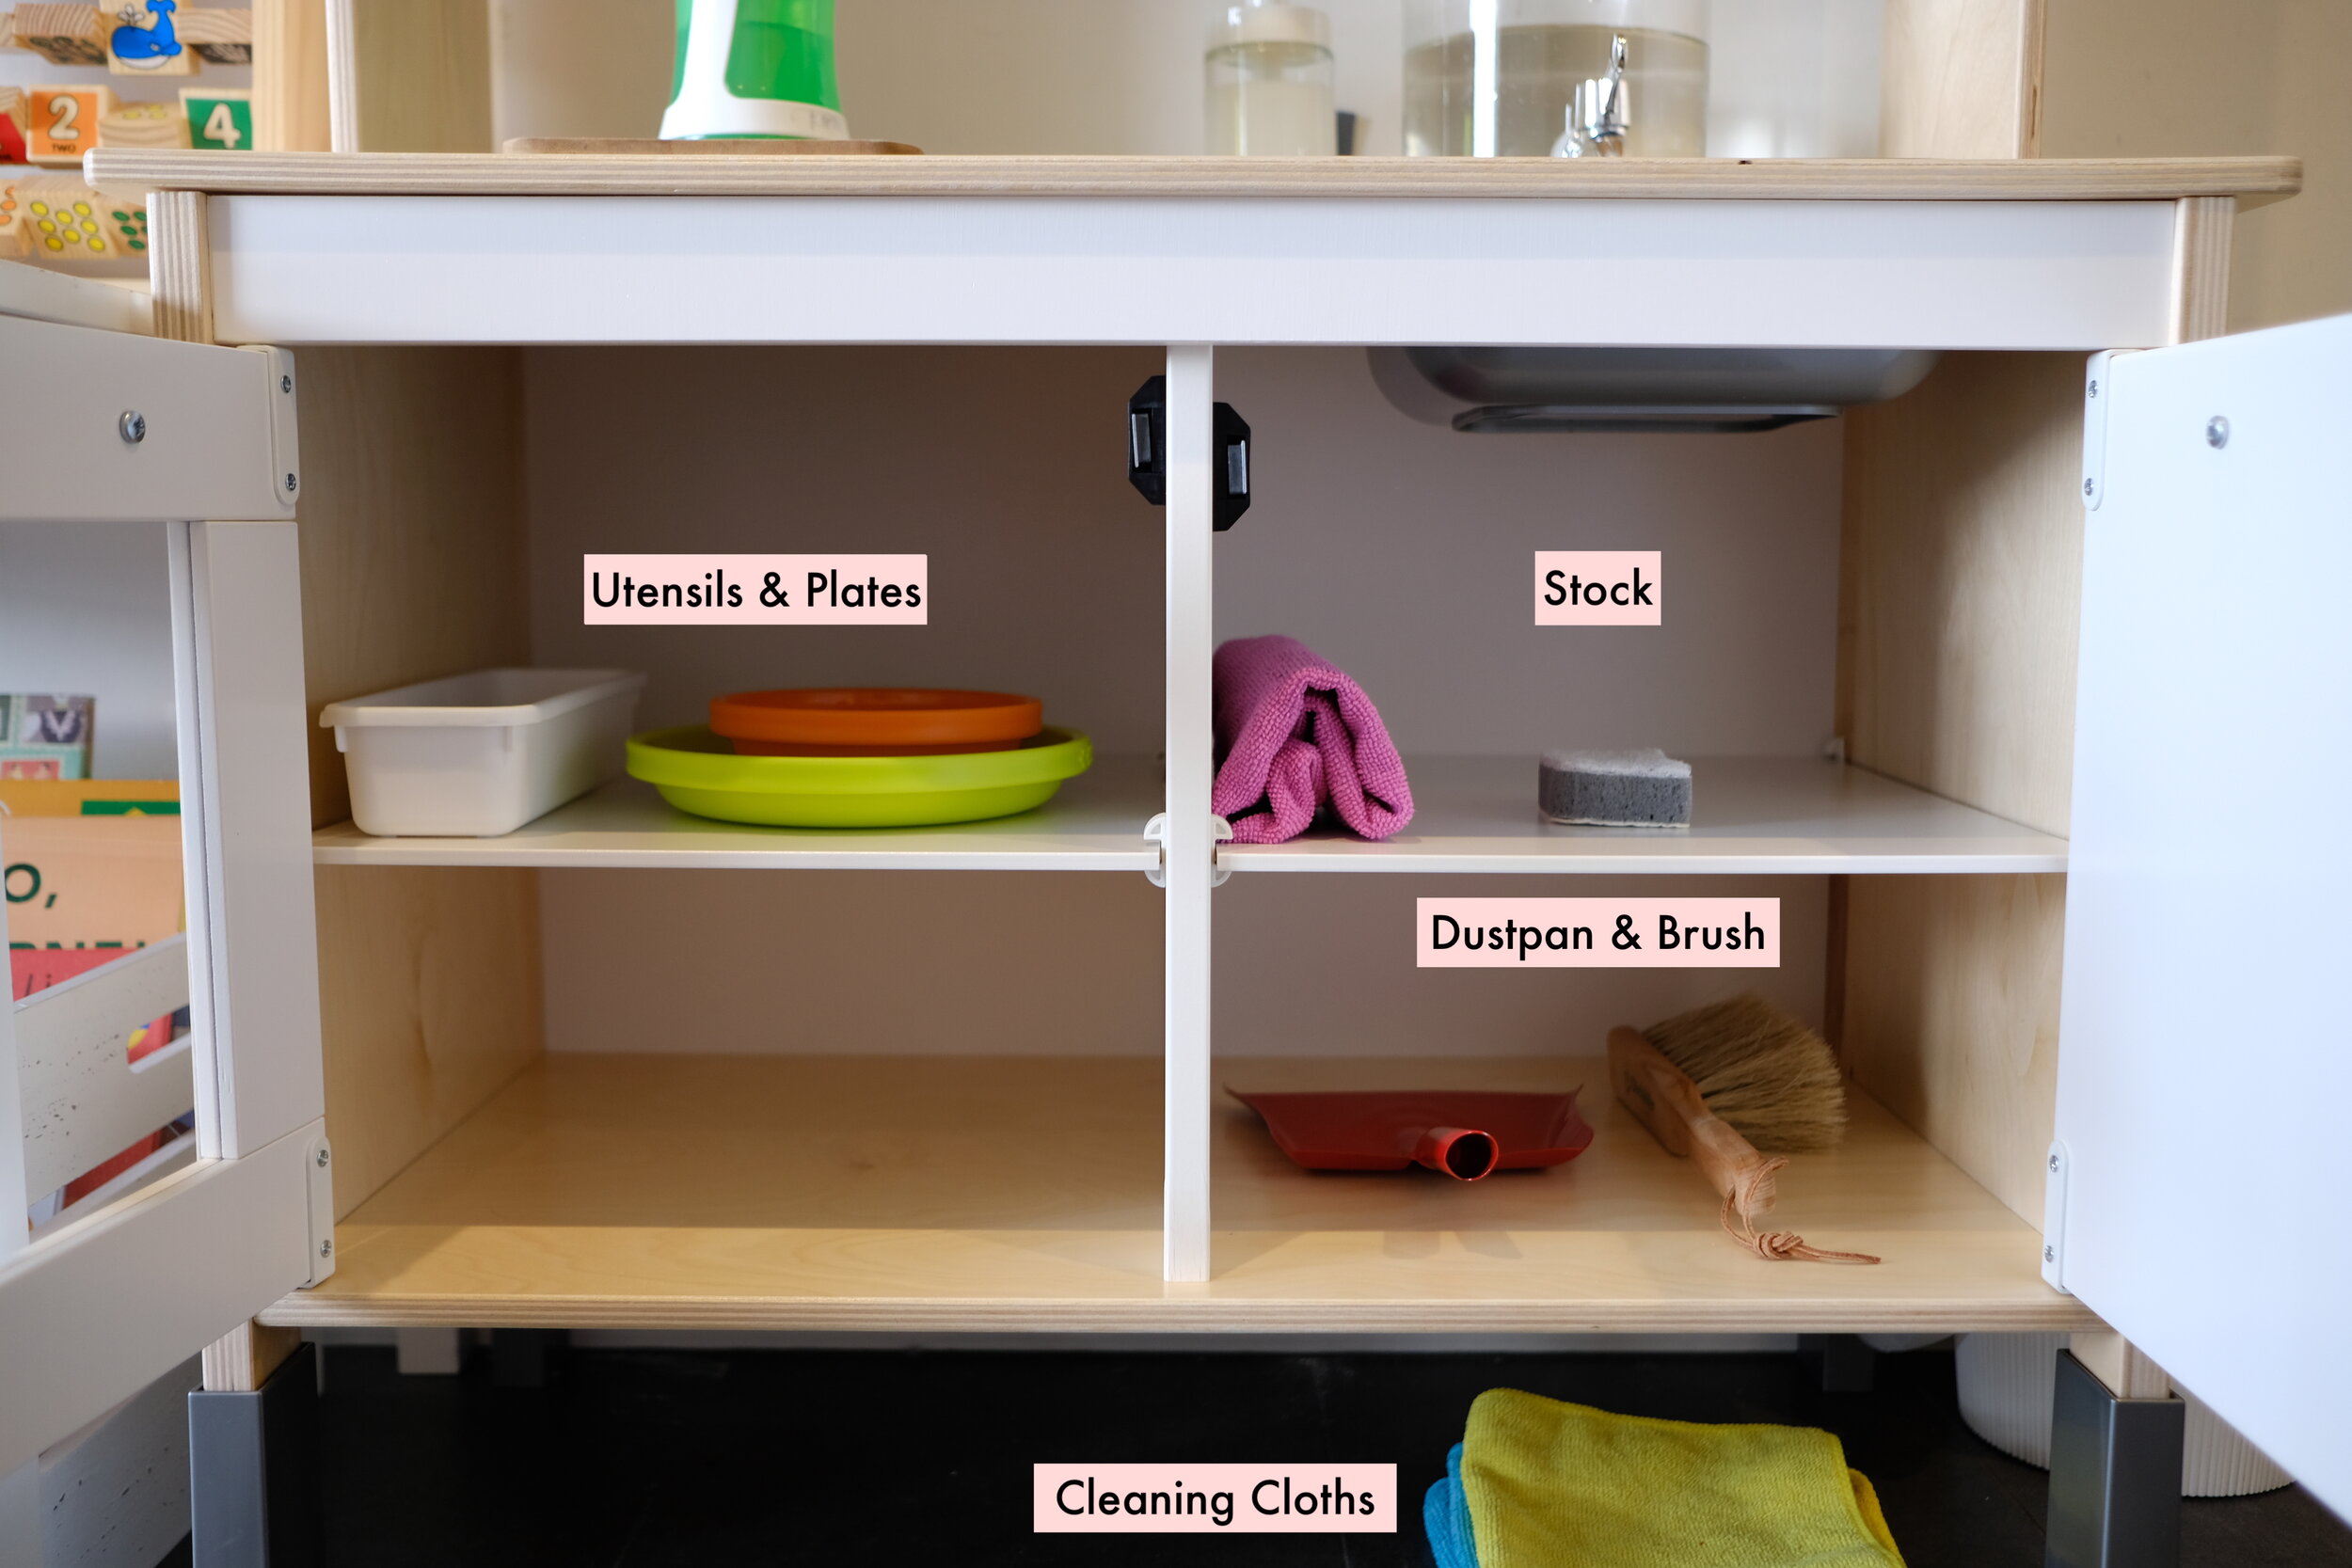
Utensils and Plates: I put his plates on the top right shelf. I also got him a tray for his utensils.
Dustpan and Brush: I bought him a dustpan and wooden brush so that he can clean-up crumbs on the floor by himself.
Cleaning Cloths: These cleaning cloths are for bigger spills. The yellow and blue cloths are to be used for floor spills and the pink one is for countertop spills that could not be cleaned with a sponge.
Stock: We also have a shelf for his stock items such as sponge and cleaning cloth.

Hand towel: On the cabinet handle I placed this colourful hand towel from Ikea.
Rubbish bin: I also placed a rubbish bin beside the play kitchen so that he can just use this to throw his used tissues in and crumbs he swept from the floor.
That is it! These are the first things I bought to set up Kimi’s kitchen. The idea is to setup the base and just add more items that I see fit along the way.

In here, I added a hook for his apron which we are planning to use soon for baking.

I eventually added measuring spoons so that he can transfer his food from one container to another or from his container to his plate. He can also use these spoons for when we are doing baking.

And lastly, I added in mugs! Which I understand should be part of the base kitchen but I just was not sure yet if I should buy him the glass or plastic ones. I ended up buying mugs which are made from renewable plastic from Ikea.


I am still looking to add more cooking and baking tools and a metal jug soon.
I was initially thinking between setting up a play kitchen for Kimi for pretend play or a functional one and decided on the latter. We do not have much space in the house and I wanted to impart practical life skills to him such as washing hands, cleaning spills, sweeping the floor, preparing his own food, throwing rubbish in the bin etc. so setting up a functional toddler kitchen is more logical for us. Rather than resorting to pretend play, I can always just teach him how to work in the kitchen and allow him to watch and help when he wanted to as long as the activity is appropriate for his age. I will introduce him to the kitchen soon - we can start with making cookies or baking a cake. Just one step at a time and we will also get there.